
The Engineer Design Process
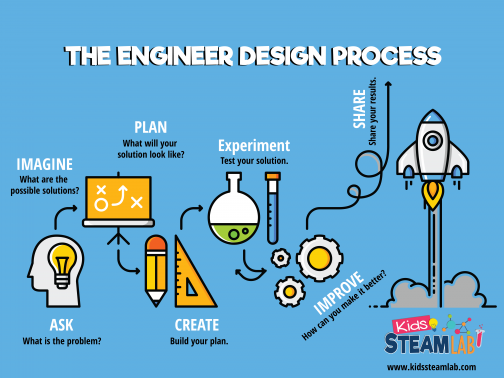
Engineer Design Process
For today’s activities, we’ll be using the Engineering Design Process as we create! Engineers rely on this process when developing new products or designing solutions to problems. It’s a series of steps focused on analyzing a problem, brainstorming solutions, and testing them out.
Keep in mind, engineers don’t always follow these steps in a strict order, and they often revisit steps multiple times before arriving at a workable solution.
As you tackle today’s challenges, follow the steps of the EDP and don’t hesitate to try various ideas before landing on the best solution!
Follow the Engineering Design Process
Design Your Shelter

Materials Needed
– Ruler
– Scissors
– Empty cereal box or cardboard
– Tape
– Plastic wrap or bubble wrap
– Pencil and paper
– Use a flattened box to create gusts of wind manually
Requirements
– Base Size : Approximately 5 x 5 inches
– Door : Must open inward (to allow opening from the inside if blocked by debris)
– Airtight : The shelter should be sealed to hold in air
– Wind Resistance : Must withstand 10 seconds of high-force winds from a dryer or fan
Step 1: Brainstorm Gather your materials and think about how you might use them in your design.
Step 2: Design Before building, sketch and label your design on paper. Architects and engineers start with blueprints to guide construction.
Step 3: Build : Create your shelter based on your design.
Step 4: Test Start with low speeds and gradually increase. See if your shelter can withstand 10 seconds of high-force winds.
Step 5: Evaluate What worked well? What could be improved?
It's ok to fail - just try something new
Step 6 : Redesign Your Prototype
Based on your evaluation, consider what changes could enhance your prototype. Think about the materials, structure, and overall design. Sketch your new ideas and label them clearly. Once you have a solid plan, begin constructing your improved prototype. Test it again to see how well it withstands the conditions.
Space Survival: Living on the Moon
Ready to embark on a journey to the Moon? First, we need to prepare by creating a safe place to stay upon arrival!
No human has set foot on the Moon since the Apollo 17 mission in December 1972. However, NASA’s Exploration Technology Development Program is crafting a plan to make the Moon a place where astronauts can live for extended periods.
The Moon is exposed to solar wind—a stream of charged particles released from the Sun’s upper atmosphere. Some of these particles can reach speeds up to 80% of the speed of light, potentially damaging spacecraft and solar panels, disrupting electronics, or affecting electric currents.
The Problem
Life on the Moon: Challenges and Solutions
Imagine living on the Moon! But before we pack our bags, let’s learn about some of the challenges we’d face.
Extreme Temperatures: The Moon can be super cold at night (down to -387°F) and super hot during the day (up to 253°F)! That’s much more extreme than any weather on Earth.
Space Rocks: Tiny micrometeoroids—small space rocks—are constantly hitting the Moon’s surface like tiny bullets.
No Atmosphere: Unlike Earth, the Moon doesn’t have an atmosphere. This means there’s no air to breathe and no protection from the Sun’s harsh rays.
Solar Wind: The Moon is exposed to solar wind, which is a stream of tiny particles coming from the Sun. These particles can be harmful to our equipment and astronauts.


Building a Moon Home
Because of these challenges, any house or habitat we build on the Moon needs to be:
– Super Strong and Sturdy: It has to protect us from extreme temperatures, space rocks, and solar radiation.
– Airtight: Since there’s no air on the Moon, our habitat must be sealed tight so we can fill it with breathable air.
– Comfortable Inside: It needs systems to keep the temperature just right, recycle water, generate power, and store and cook food.
– Lightweight Materials: We have to send all the building materials from Earth using rockets, so everything needs to be as light as possible.
– Easy to Build: The habitat will arrive in pieces and astronauts will put it together while wearing bulky space suits, so it should be simple to assemble.
Building a home on the Moon is a big challenge, but with creativity and teamwork, we can make it possible!
Activity 2:
Understanding Parachutes
The Science of Parachutes
Parachutes are essential in aerospace for slowing down objects as they descend through an atmosphere. They create drag, which reduces speed and ensures a safe landing. Parachutes are made from durable, lightweight materials like polyester and nylon, and are designed to handle significant loads. Engineers use data from past missions to refine parachute designs, ensuring they can support the weight and conditions of new projects.
STEM Challenge: Design a Parachute
Are you ready to put your engineering skills to the test? Design and build your own parachute using the guidelines provided. Think about the materials you’ll use and how you’ll construct your parachute to maximize drag and ensure a safe descent. Test your design and see how well it performs. Share your results with us and see how your design compares to others!
Super Strong Space Parachutes
How Engineers Help Spacecraft Land Safely!
The design of a parachute depends on the load it needs to carry. Loads are the forces the parachute experiences upon full inflation. Engineers calculate loads using atmospheric density, velocity, parachute drag area, and mass. They use data from previous missions to improve parachute designs for new projects. For instance, the parachute for the Mars Exploration Rover was 40% larger than Pathfinder’s because the Rover weighed more than twice as much—8,000 lbs compared to 18,000 lbs.
The parachute is crafted from two durable, lightweight fabrics: polyester and nylon. It is made of Kevlar—the same material used in bulletproof vests. These materials must be strong yet lightweight to fit inside a very confined space and to avoid adding excess weight to the backshell. The available space on the spacecraft for the parachute is so limited that it must be pressure-packed. Before launch, a team meticulously folds the 48 suspension lines, three bridle lines, and the parachute. They then use a special structure to apply heavy weight to compress the parachute package, much like compressing clothes to fit into a suitcase.
Before You Begin
The Goal:
Using the design process, create the most
effective parachute that will safely and gently
land a payload
What you need:
Plastic Bags
String or yarn
Tape
Paperclip
Let's Do This!
1. Plan Your Parachute
Draw your parachute ideas.
Choose your materials.
Think about what will work best.
2. Build It
Create your parachute canopy.
Cut and attach strings.
Secure your payload to the strings.
3. Test It
Set up a landing target.
Drop your parachute from a safe spot.
Watch how it falls:
Does it fall slowly?
Does it land softly?
Does it hit the target?
4. Improve It
What worked well?
What can you make better?
Adjust your design and test again.
5. Share and Learn
Show your parachute to others.
Discuss what you learned.
See what ideas others had.
Keep Experimenting and Have Fun!
Reflect on Your Learning
Update Your KWL Chart

Take a moment to think about what you have learned today. Go back to your KWL chart and add any new information you have discovered under the ‘L’ column. Review the questions you had in the ‘W’ column and see if you can answer any of them now. If you have new questions or areas of interest, add them to the ‘W’ column. This reflection process will help you track your learning progress and identify new areas to explore. Remember, learning is a continuous journey!